 ultimate-guide
How to Maintain Exotic Plants: A 2026 Care Guide
Table of Contents
- What You'll Need Before You Start
- Step 1: Match Light to Your Exotic Plants
- Step 2: Watering Frequency and Techniques
- Step 3: Choose the Best Soil for Exotic Plants
- Step 4: How to Increase Humidity for Indoor Plants
- Step 5: Indoor Plant Pest Control and Quarantine
- Step 6: Fertilizing and Seasonal Care Adjustments
- Common Mistakes to Avoid with Exotic Plants
- Frequently Asked Questions
Last Updated: September 14, 2026
What You'll Need Before You Start
Maintaining exotic plants is the practice of recreating a tropical environment indoors by controlling light, water, humidity, soil, and nutrients. Get those five variables right, and most exotic plants thrive with minimal intervention.
Maintaining exotic plants requires attention to detail. Before you touch a single leaf, gather these:
- A moisture meter or a wooden skewer for checking soil moisture
- A humidity gauge to track humidity levels
- A watering can with a narrow spout
- Well-draining potting mix with perlite or bark
- A spray bottle or pebble tray
- Sharp, clean pruning shears
- A quarantine spot away from your other plants
The single biggest mistake is buying a beautiful plant and treating it like furniture. Exotics are not low-maintenance decorations; they are living organisms with specific requirements.
Step 1: Match Light to Your Exotic Plants
Getting light right takes ten minutes and prevents months of decline. Most exotic plants want bright indirect light, meaning they need strong illumination without direct midday sun. A south- or east-facing window with a sheer curtain is often ideal.
Direct sun scorches foliage, especially on thin-leaved tropicals. Too little light stalls growth and causes leggy, pale stems. Watch your plant for a week: if new growth stretches toward the window, it needs more light; if leaf edges crisp and brown, it needs less.
Rotate your plant a quarter turn each week so all sides receive even exposure. This small habit prevents lopsided growth and keeps foliage maintenance simple.
Step 2: Watering Frequency and Techniques
Water when the top inch or two of soil feels dry, not on a fixed calendar. Frequency depends on light, temperature, pot size, and substrate composition, so two identical plants in different rooms can need water a week apart.
Use the "drench and drain" method: water thoroughly until it runs from the drainage holes, then empty the saucer. Never let a pot sit in standing water. During the growing season, most exotics need more frequent watering; during the dormancy period, cut back significantly.
Automatic irrigation helps if you travel, but it cannot replace checking soil moisture. Test with a meter or your finger before every watering.
| Signal | Likely Cause | Fix |
|---|---|---|
| Yellow lower leaves | Overwatering | Let soil dry, check drainage holes |
| Crisp brown leaf edges | Low humidity or underwatering | Raise humidity, water more evenly |
| Leggy pale growth | Insufficient light | Move closer to a bright window |
| Wilting despite wet soil | Root rot | Repot, trim damaged roots |
Step 3: Choose the Best Soil for Exotic Plants
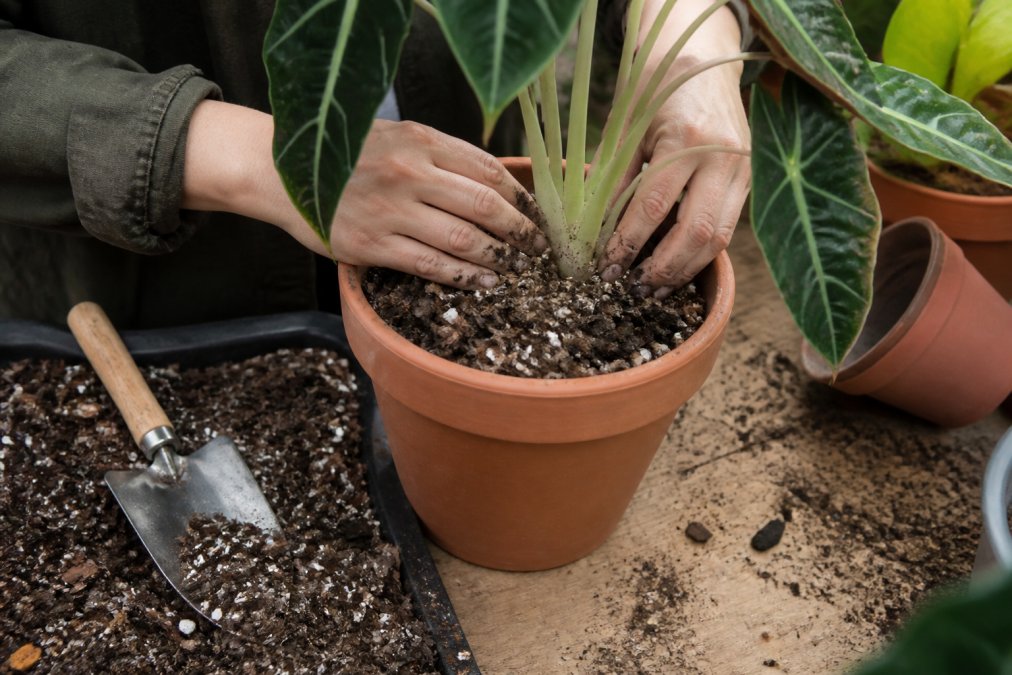
The best soil for exotic plants is a chunky, well-draining mix that holds moisture without staying soggy. Standard potting mix alone compacts and suffocates roots. Blend it with perlite, orchid bark, or sphagnum moss to create air pockets that roots need.
Substrate Composition and Drainage Holes
Aim for roughly two parts potting mix to one part perlite and one part bark. This ratio suits most tropical and epiphytic plants. Terrestrial plants that prefer consistent moisture can take slightly more potting mix.
Drainage holes are non-negotiable. A decorative cachepot without holes traps water and invites root rot. If you love a holeless container, use it as a sleeve and keep the plant in a nested pot with proper drainage.
Step 4: How to Increase Humidity for Indoor Plants
To increase humidity for indoor plants, group them together, use a pebble tray, or run a small humidifier nearby. Most tropical plants want humidity levels between 50 and 70 percent, far higher than a typical heated or air-conditioned room provides (extension.umn.edu). But "raise the humidity" is not a single action, it is a target number you measure and hold, and different exotics sit at different points on that scale.
Start by knowing your baseline. A cheap hygrometer placed at leaf level (not on the wall across the room) tells you what the plant actually experiences. A common pattern is a 15 to 25 percent gap between the reading near a heating vent and the reading inside a clustered group of plants two feet away. Measure before you buy equipment.
Species Humidity Targets
Not every exotic wants a rainforest. Match the target to the plant:
- Ferns, calatheas, and most aroids (Monstera, Philodendron): 60 to 70 percent. These are the plants that crisp at the edges in dry indoor air.
- Orchids (Phalaenopsis, Dendrobium): 50 to 70 percent, but with strong air movement, stagnant humid air rots their crowns.
- Succulent-adjacent exotics (some bromeliads, desert-origin species): 30 to 50 percent. Pushing these into a 70 percent micro-climate invites rot.
- Carnivorous and bog-origin exotics: 70 percent and up, often best handled in an enclosed setup.
Micro-Climate Creation for Tropical Environments
You can build a micro-climate without a greenhouse, and the technique matters more than the gadget.
Pebble trays work by evaporation from a shallow water layer below the pot. The catch: they only raise humidity in the immediate few inches around the plant, so they help a single small specimen, not a shelf. Keep the water level below the top of the pebbles so the pot never sits in water.
Grouping is the most efficient method. Cluster five or more plants so their combined transpiration raises local moisture. A tight group can hold several points higher humidity than an isolated plant in the same room. Leave a few inches between pots so air still moves.
Enclosed and semi-enclosed setups give the most control:
- A glass cloche or clear plastic dome over a single plant creates near-100 percent humidity, useful for rooting cuttings and rehabbing a struggling exotic, but lift it daily to exchange air.
- A DIY terrarium (a lidded glass jar or a fish tank with a partial lid) holds steady humidity for small, moisture-loving species. Open the lid for a few hours weekly to prevent mold.
- A bathroom with a window is a free micro-climate if you shower regularly, but only if the plant gets adequate light and the room does not stay cold.
Humidifiers give the most consistent control and are worth it if you keep many exotics in one room. Place the unit so its mist drifts toward the plants rather than blasting one leaf, and clean the reservoir regularly, a dirty humidifier spreads bacteria across foliage.
Misting helps briefly but evaporates within minutes and can encourage fungus gnats and leaf-spot fungi if foliage stays wet. Skip it in favor of more reliable methods.
Balancing Humidity Against Airflow and Temperature
Humidity, temperature, and airflow are one system. Warm air holds more moisture than cool air, so a room that drops 10 degrees overnight can push relative humidity up and leave foliage wet, a setup for fungal issues. Run a small oscillating fan on low 24/7 in humid rooms, and avoid crowding leaves against glass or walls where condensation collects. If you use a humidifier, aim the output into the air space, not directly at the plant, and check that water does not pool in the crown or leaf axils of rosette-forming exotics.
Step 5: Indoor Plant Pest Control and Quarantine
Indoor plant pest control starts with prevention. Inspect every new plant before it joins your collection, and quarantine it for two to three weeks. Spider mites, fungus gnats, and scale spread quickly through a grouped collection, and a single overlooked arrival can seed an infestation across an entire shelf.
Check the undersides of leaves, leaf joints, and the soil surface weekly. Wipe foliage with a damp cloth to remove dust and spot early infestations. Leaf cleaning also helps the plant photosynthesize efficiently.
Reading the Three Most Common Pests
- Spider mites show as fine webbing at leaf joints and stippled, speckled upper leaves. They thrive in dry, warm air, the same conditions that stress many exotics. Rinse foliage, then treat with insecticidal soap or neem oil, repeating every five to seven days for at least three rounds because eggs survive the first pass.
- Fungus gnats are the small flies hovering over soil. They signal consistently wet substrate. Let the top inch dry between waterings, and consider a bottom-watering routine. Yellow sticky traps catch adults; a biological control such as Bacillus thuringiensis israelensis (Bti) drenches target larvae.
- Scale appears as small brown or tan bumps along stems and leaf veins. It is slow but stubborn. Dab individual insects with isopropyl alcohol on a cotton swab, then follow with horticultural oil to smother the crawlers.
If you find pests, isolate the plant immediately. For heavy infestations, repot in fresh substrate and discard the old soil, do not compost it into your other pots.
Root Health Diagnostics and Flushing Soil
Root rot is the most common killer of exotic plants, and it starts below the surface. Learn to read a root system before symptoms reach the leaves.
Healthy roots are firm, pliable, and light, white, cream, or tan depending on species. Root-bound plants show a dense, circling mat of roots pressed against the pot wall; they are not sick, but they need a larger pot and will dry out fast. Rotting roots are mushy, dark brown or black, and smell sour or sulfurous. If the soil smells like a swamp when you water, suspect rot even before you unpot.
To diagnose, slide the plant from its pot and inspect the root ball. Trim damaged roots with sterilized shears, cutting back to firm, healthy tissue. Repot in fresh, well-draining mix, and water sparingly until new growth appears, a damaged root system cannot take up water fast enough to keep up with a normal schedule.
Water Quality and Mineral Sensitivity
This is the maintenance step most guides skip, and it explains a lot of mystery decline in exotics. Many tropical species are sensitive to the minerals and additives in tap water.
- Fluoride and chlorine in municipal water can cause tip burn and marginal browning on sensitive plants such as spider plants, dracaenas, and some calatheas. Letting water sit overnight dissipates chlorine but does not remove fluoride or chloramine, for those, use filtered, distilled, or rainwater (the EPA).
- Dissolved salts from fertilizer and tap water accumulate in the soil over months. This shows up as a crust on the soil surface and brown, crispy leaf tips even when humidity is fine.
- pH matters because it controls nutrient availability. Most exotics take up nutrients best in a slightly acidic range, roughly 5.5 to 6.5. A simple soil pH test kit tells you where you stand; if the reading drifts high, the plant can show deficiency symptoms even when you are fertilizing correctly.
Flushing the soil every few months removes salt buildup. Pour water through the pot several times, roughly three to four times the pot's volume, and let it drain fully each time. Do this in a sink or outdoors, not over a saucer. If your tap water is hard, flush with filtered or distilled water so you are not adding minerals while trying to remove them.
Step 6: Fertilizing and Seasonal Care Adjustments
Feed lightly during the growing season and stop during dormancy. Exotic plants in nutrient-poor soil benefit from diluted fertilizer, but overfeeding burns roots and causes salt accumulation.
Use a balanced liquid fertilizer at half the recommended strength, applied every four to six weeks in spring and summer. In fall and winter, most plants slow down and need little to no feeding. Seasonal care adjustments matter more than any single product: reduce water, hold fertilizer, and watch for temperature fluctuations near drafty windows or heating vents.
Common Mistakes to Avoid with Exotic Plants
The most damaging mistake is watering on a fixed schedule instead of checking soil moisture. Close behind: using heavy soil without drainage, ignoring humidity, and skipping pest quarantine.
A few more to watch:
- Placing plants in direct sun and scorching the foliage
- Letting pots sit in standing water
- Fertilizing during the dormancy period
- Skipping acclimatization when moving a plant to a new spot
For a complete exotic garden design, professional installation can be beneficial. Gorilla Treescape LLC handles design, planting, and ongoing maintenance.
Frequently Asked Questions
What is the 3-year rule for plants?
The 3-year rule suggests that exotic plants often need about three years to fully acclimatize to a new indoor environment. During this period, expect some leaf drop, slower growth, and a need for consistent humidity and light. After acclimation, many tropical plants become more resilient. Patience and stable conditions are key to surviving this transition phase.
How do you keep tropical plants alive indoors?
Keep tropical plants alive indoors by providing bright indirect light, maintaining humidity above 50%, and watering only when the top inch of soil feels dry. Use well-draining soil and pots with drainage holes to prevent root rot. Avoid placing plants near air vents or drafty windows, and inspect leaves weekly for pests like spider mites or fungus gnats.
Do tropical plants like to be misted?
Misting provides a temporary humidity boost but does not replace proper humidity control. Most tropical plants benefit from consistent humidity levels between 50% and 70%. Instead of misting, use a humidifier, group plants together, or place pots on a pebble tray with water. Misting can sometimes encourage fungal issues if leaves stay wet too long, so use it sparingly.
What are the signs of overwatering in tropical plants?
Signs of overwatering include yellowing lower leaves, mushy stems, mold on the soil surface, and fungus gnats. Roots may turn brown or black and smell foul. If you notice these signs, stop watering, let the soil dry out, and check drainage holes. Repot with fresh, well-draining soil if root rot is advanced.
Maintaining exotic plants rewards attention to detail, and the details add up fast. If you want a tropical landscape that looks established from day one and stays that way, Gorilla Treescape LLC brings custom garden design, exotic plant installation, and reliable maintenance to every project. Our team manages the full process, from concept to completion, so you get a thriving outdoor space without the trial and error. Get a quote today and let us build a landscape that lasts.